| Categories | Carrier HVAC Manuals |
|---|---|
| Document Type | Heating, Ventilating and Air Conditioning Manual Free Download. HAVC Operator's Instruction Manual. |
| Tags | Carrier 58D, Carrier 58S |
| Download File |
|
| Language | English |
| Product Brand | Carrier. Support Phone Number: In North America, please call 1-800-CARRIER for immediate customer assistance from 8:00a -5:00p (EST) weekdays , Heating, Ventilating and Air Conditioning - HVAC |
| Document File Type | |
| Publisher | corp.carrier.com |
| Wikipedia's Page | Carrier Corporation |
| Copyright | Attribution Non-commercial |
Inducer Motor Kit Cancels: New IIK 398A-40-33 7/15/91 Installation Instructions NOTE: Read the entire instruction before starting the installation. Part No.317292-751 INTRODUCTION This instruction covers the installation of Inducer Motor Kit Part No. 317292-751 on Model 398A, 399A, 58DX, 58DXA, 58DXC, 58SX, 58SXA, and 58SXC Gas-Fired Condensing Furnaces. SAFETY CONSIDERATIONS Installation and servicing of heating equipment can be hazardous due to gas and electrical components.
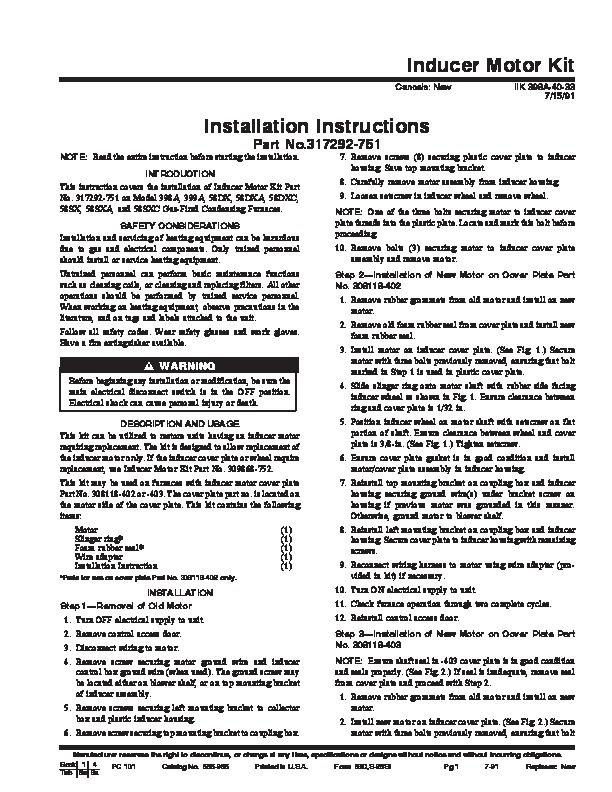
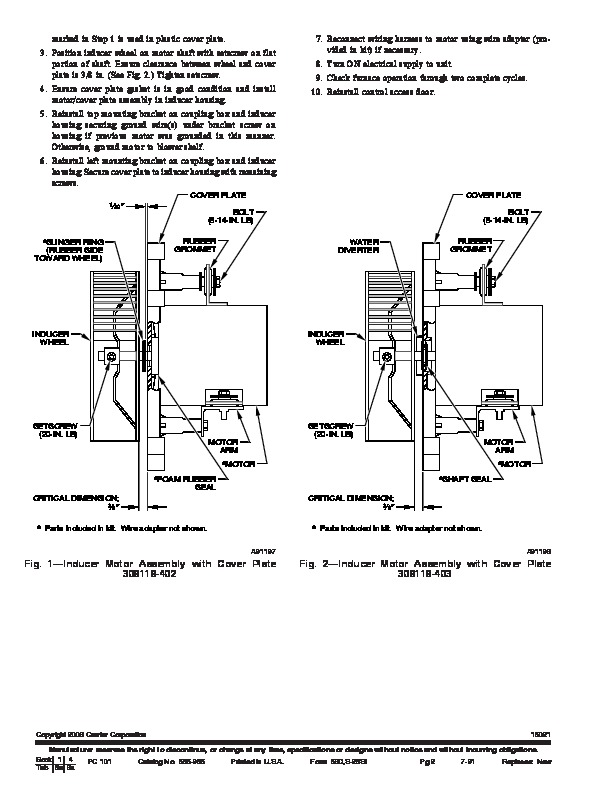
Only trained personnel should install or service heating equipment. Untrained personnel can perform basic maintenance functions such as cleaning coils, or cleaning and replacing filters. All other operations should be performed by trained service personnel. When working on heating equipment, observe precautions in the literature, and on tags and labels attached to the unit. Follow all safety codes. Wear safety glasses and work gloves. Have a fire extinguisher available. 7. Remove screws (8) securing plastic cover plate to inducer housing. Save top mounting bracket. 8. Carefully remove motor assembly from inducer housing. 9. Loosen setscrew in inducer wheel and remove wheel. NOTE: One of the three bolts securing motor to inducer cover plate threads into the plastic plate. Locate and mark this bolt before proceeding. 10. Remove bolts (3) securing motor to inducer cover plate assembly and remove motor. Step 2–Installation of New Motor on Cover Plate Part No. 308118-402 1. Remove rubber grommets from old motor and install on new motor. 2. Remove old foam rubber seal from cover plate and install new foam rubber seal. 3. Install motor on inducer cover plate. (See Fig. 1.) Secure motor with three bolts previously removed, ensuring that bolt marked in Step 1 is used in plastic cover plate. 4. Slide slinger ring onto motor shaft with rubber side facing inducer wheel as shown in Fig. 1. Ensure clearance between ring and cover plate is 1/32 in. 5. Position inducer wheel on motor shaft with setscrew on flat portion of shaft. Ensure clearance between wheel and cover plate is 3/8-in. (See Fig. 1.) Tighten setscrew. 6. Ensure cover plate gasket is in good condition and install motor/cover plate assembly in inducer housing. 7. Reinstall top mounting bracket on coupling box and inducer housing securing ground wire(s) under bracket screw on housing if previous motor was grounded in this manner. Otherwise, ground motor to blower shelf. 8. Reinstall left mounting bracket on coupling box and inducer housing. Secure cover plate to inducer housing with remaining screws. 9. Reconnect wiring harness to motor using wire adapter (provided in kit) if necessary. 10. Turn ON electrical supply to unit. 11. Check furnace operation through two complete cycles.