


| Categories | Carrier HVAC Manuals |
|---|---|
| Document Type | Heating, Ventilating and Air Conditioning Manual Free Download. HAVC Operator's Instruction Manual. |
| Tags | Carrier 58ST5810SI |
| Download File |
|
| Language | English |
| Product Brand | Carrier. Support Phone Number: In North America, please call 1-800-CARRIER for immediate customer assistance from 8:00a -5:00p (EST) weekdays , Heating, Ventilating and Air Conditioning - HVAC |
| Document File Type | |
| Publisher | corp.carrier.com |
| Wikipedia's Page | Carrier Corporation |
| Copyright | Attribution Non-commercial |
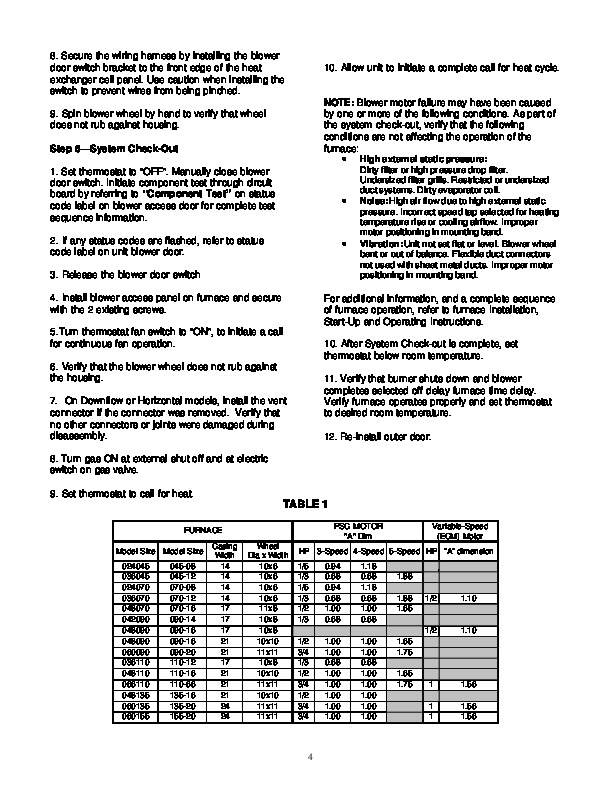
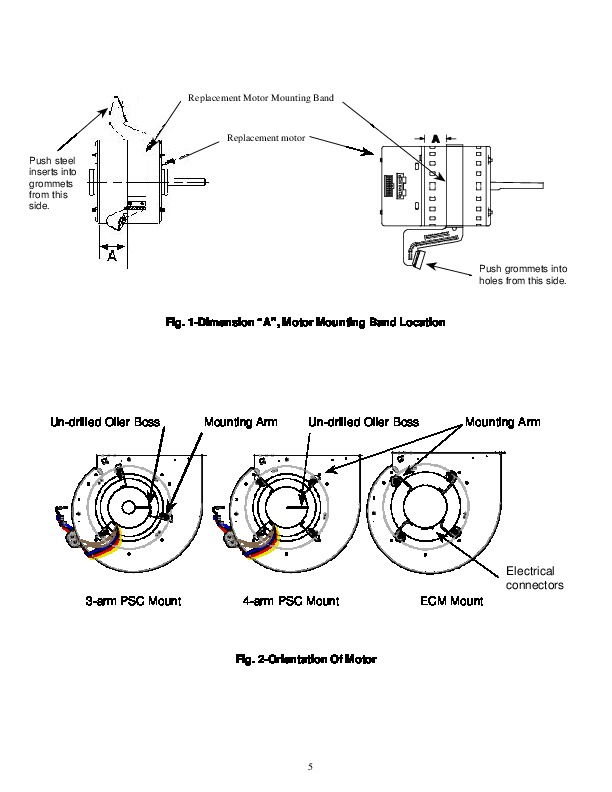
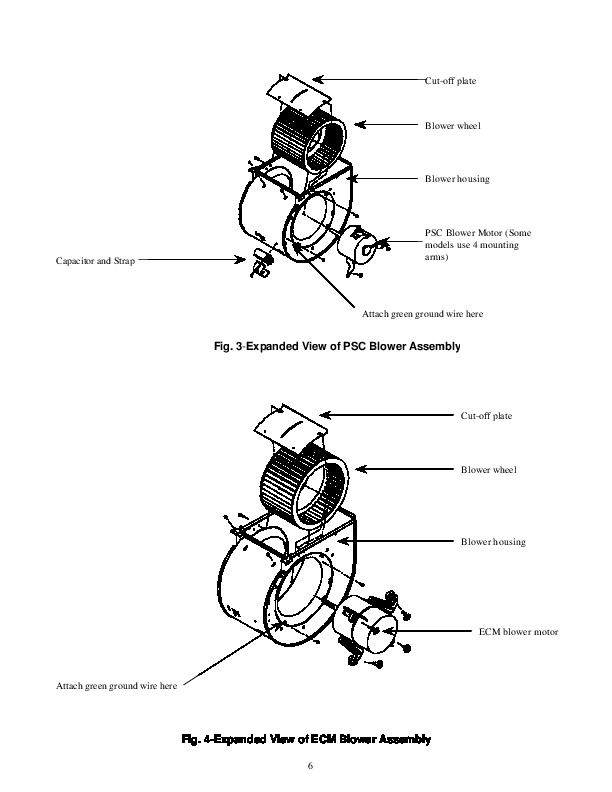
Torsion-Flex Motor mount for PSC motors and Rigid-Mount for ECM motors Replacement Kit Cancels: New IIK-310A-45-11 6/02 Installation Instructions Part No. 327752-401, Part No. 327753-401 Part No. 327754-401 NOTE: Read the entire instruction manual before starting the installation. SAFETY CONSIDERATIONS Installing and servicing heating equipment can be hazardous due to gas and electrical components.
Only trained personnel should install or service heating equipment. Untrained personnel can perform basic maintenance functions such as cleaning coils, or cleaning and replacing filters. All other operations should be performed by trained service personnel. When working on heating equipment, observe precautions in the literature, on tags, and on labels attached to the unit. Recognize safety information. This is the safety-alert symbol. When you see this symbol on the unit and in instructions or manuals, be alert to the potential for personal injury. Understand the signal words DANGER, WARNING, and CAUTION. These words are used with the safety-alert symbol,. DANGER identifies the most serious hazards which will result in severe personal injury or death. WARNING signifies a hazard which could result in personal injury or death. CAUTION is used to identify unsafe practices which would result in minor personal injury or product and property damage. NOTE is used to highlight suggestions which will result in enhanced installation, reliability, or operation. Follow all safety codes. Wear safety glasses and work gloves. Have a fire extinguisher available. INTRODUCTION This instruction covers the installation of replacement torsion-flex motor mount or rigid motor mount on noncondensing, 33.3-inch high, mid-efficiency hot surface igniter furnaces. DESCRIPTION AND USAGE These kits can be utilized to replace a blower motor with an approved service replacement motor instead of using the original factory motor with the mounting arms directly attached to the motor. This kit contains the following items (See Table 1) Table 1-Kit Contents Kit No. 327752-401 3 arm Torsion Flex Mount (PSC) Self-locking ¼-20 hex nut ¼-20 x 1 ½ ” long hex bolt Rubber grommets w/steel inserts Instruction sheet Qty. 3 1 Kit No. 327753-401 4 arm Torsion Flex Mount (PSC) Self-locking ¼-20 hex nut ¼-20 x 1 ½ ” long hex bolt Rubber grommets w/steel inserts Instruction sheet Kit No. 327754-401 4 arm Rigid Mount (ECM) Self-locking ¼-20 hex nut ¼-20 x 1 ½ ” long hex bolt Rubber grommets Instruction sheet Qty. 4 1 Qty. 4 1 WARNING: Improper installation, adjustment, alteration, service, maintenance, or use can cause carbon monoxide poisoning, explosion, fire, electrical shock, or other conditions which could result in personal injury or death. Consult your distributor or branch for information or assistance. The qualified installer or agency must use only factory-authorized kits or accessories when servicing this product. Failure to follow instructions could result in serious injury or property damage. A replacement motor, capacitor or ECM module is NOT included in this kit and must be ordered separately if needed. SFM2453 Manufacturer reserves the right to discontinue, or change at any time, specifications or designs without notice and without incurring obligations. PC 101 Catalog No. 535-80088 Printed in U.S.A Form 58ST-10SI Pg. 1 6/02 Replaces: New INSTALLATION Step 1–Remove the Existing Blower Assembly 1. Turn off electric supplies to unit and thermostat. More than 1 disconnect may be required to disconnect power to unit. 2. Remove exterior door by loosening knurled knob on door and pulling forward. 3. Turn off gas at external supply shutoff and turn electric switch on gas control “OFF ” 11. Move the control aside. Secure control assembly aside with a scrap length of wire or tape. 12. Using a 5/16-nut driver remove the blower housing mounting screws that secure the blower assembly to the blower shelf. 13. Slide the blower assembly forward, out of the blower compartment. Step 2–Remove Blower Motor 1. Clean blower wheel with a small paintbrush or flux brush. Be careful not to dislodge balance clips attached to the blower wheel blades.