| Categories | Mitsubishi HVAC Manuals |
|---|---|
| Document Type | Heating, Ventilating and Air Conditioning Manual, HVAC. |
| Tags | Mitsubishi PAC SH53TM E |
| Download File |
|
| Language | English |
| Product Brand | Heating, Ventilating and Air Conditioning Manual, Mitsubishi Electric US, Inc. Americas Corporate Office Phone: 714-220-2500; Application support or for technical information regarding applications for Mr. Slim, Toll-free: 1-800-433-4822 |
| Document File Type | |
| Publisher | mehvac.com |
| Wikipedia's Page | Mitsubishi Electric |
| Copyright | Attribution Non-commercial |
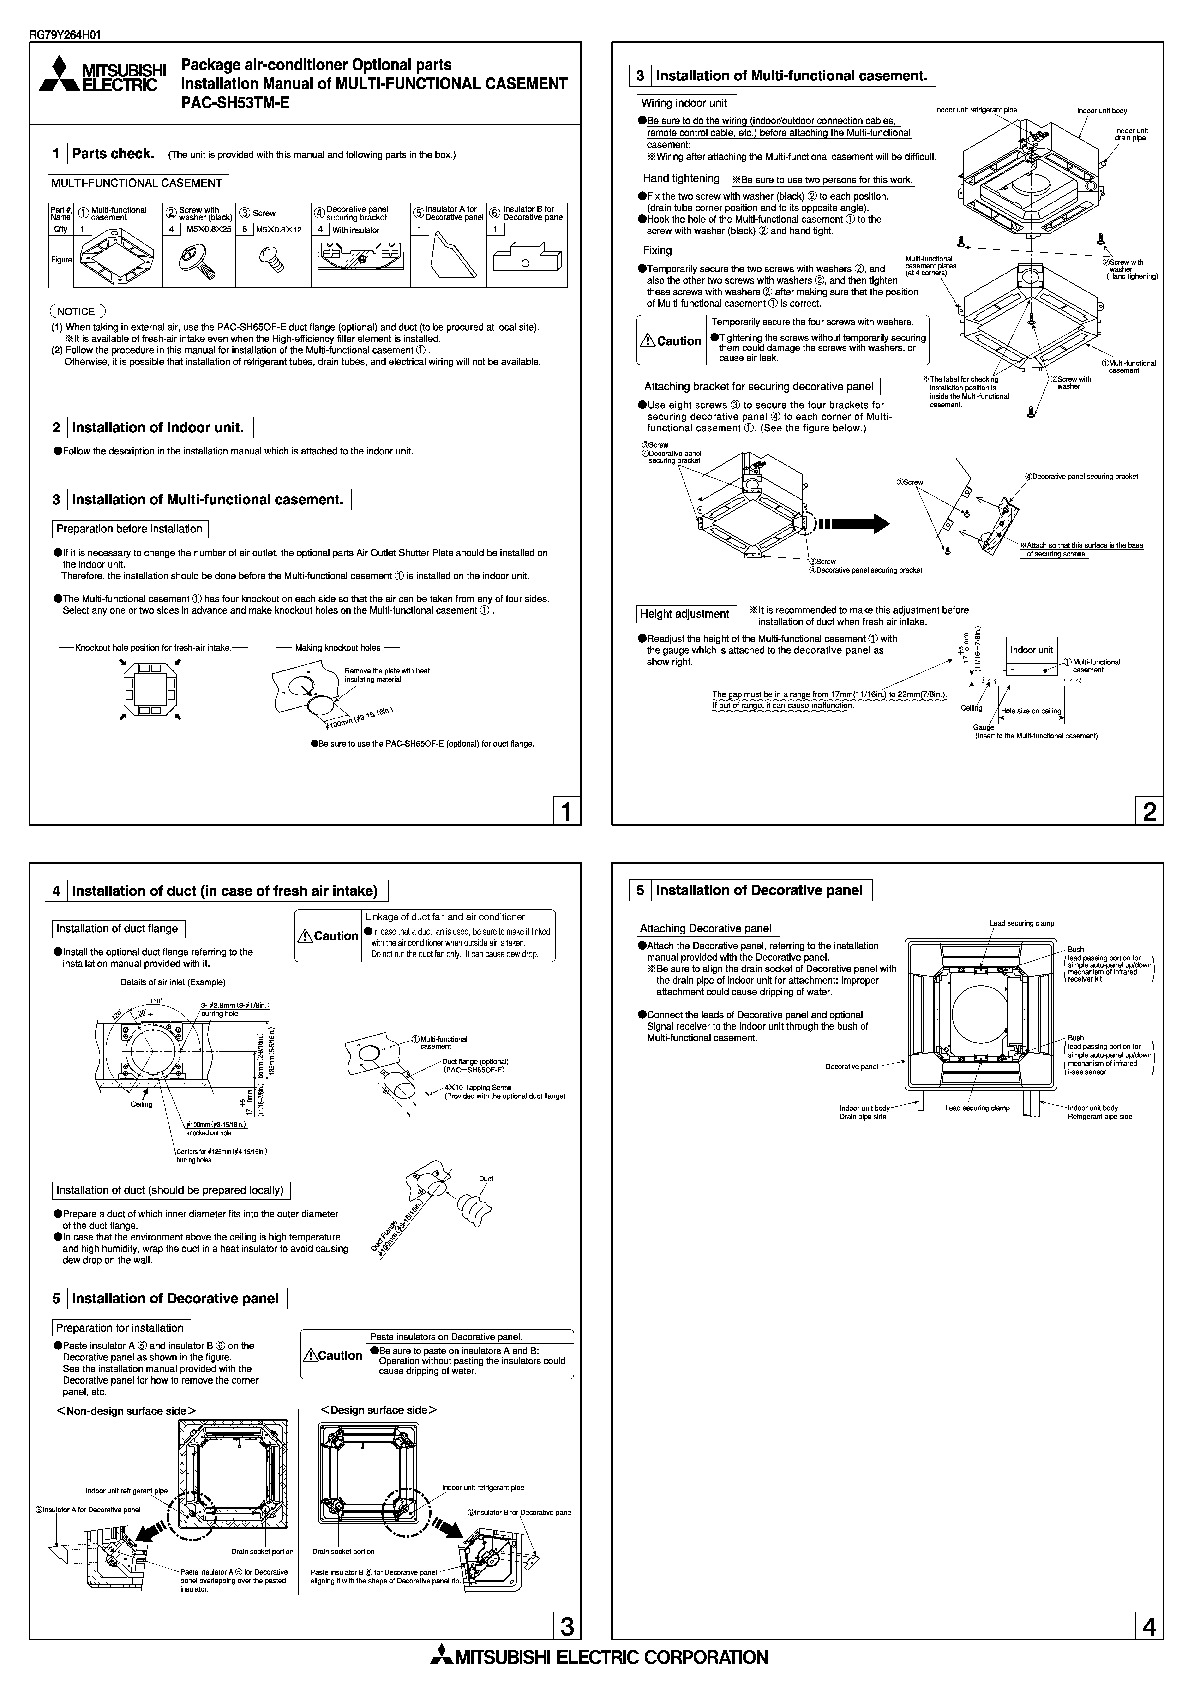
RG79Y264H01. .ELECTRIC · MITSUBISHI Package air-conditioner Optional parts Installation Manual of MULTI-FUNCTIONAL CASEMENT PAC-SH53TM-E [!] Installation of Multi-functional casement. I Wiring indoor unit I Indoor unit refrigerant pipe Indoor unit body Indoor unit drain pipe IT] Parts check. Part #, Name I (The unit is provided with this manual and following parts in the box.) .Be sure to do the wiring (indoor/outdoor connection cables, remote control cable, etc.) before attaching the Multi-functional casement: *Wiring after attaching the Multi-functional casement will be difficult.
I I MULTI-FUNCTIONAL CASEMENT I Hand tightening I *Be sure to use two persons for this work. CD casement Multi-functional 1 Screw f2′ washerwith bJ (black) 4 M5XO.8X25 fj Screw gJ Decorative panel @ securing bracket @ Insulator A for Decorative panel @ Insulator B for Decorative panel a’ly Figure 8 M5XO.8X12 .Fix the two screw with washer (black) (2) to each position. (drain tube corner position and to its opposite angle). .Hook the hole of the Multi-functional casement CD to the screw with washer (black) (2) and hand tight. I Fixing I (NOTICE) (1) When taking in external air, use the PAC-SH650F-E duct flange (optional) and duct (to be procured at local site). * It is available of fresh-air intake even when the High-efficiency filter element is installed. (2) Follow the procedure in this manual for installation of the Multi-functional casement CD. Otherwise, it is possible that installation of refrigerant tubes, drain tubes, and electrical wiring will not be available. I .Temporarily secure the two screws with washers (2), and also the other two screws with washers (2), and then tighten these screws with washers (2) after making sure that the position of Multi-functional casement CD is correct. Temporarily secure the four screws with washers. I ,(g)Screw with washer (Hand tighening) Caution .Tightening the screws without temporarily securing them could damage the screws with washers, or cause air leak. *The label for checking installation position is inside the Multi-functional casement. (g)Screw with washer (j)Multi-functional casement Attaching bracket for securing decorative panel I [I] Installation of Indoor unit. I .Use eight screws @ to secure the four brackets for securing decorative panel @ to each corner of Multifunctional casement CD. (See the figure below.) .Follow the description in the installation manual which is attached to the indoor unit. [!] Installation of Multi-functional casement. I Preparation before installation I .If it is necessary to change the number of air outlet, the optional parts Air Outlet Shutter Plate should be installed on the indoor unit. Therefore, the installation should be done before the Multi-functional casement CD is installed on the indoor unit. .The Multi-functional casement CD has four knockout on each side so that the air can be taken from any of four sides. Select anyone or two sides in advance and make knockout holes on the Multi-functional casement CD. @Screw @Decorative panel securing bracket I Height adjustment I * It is recommended to make this adjustment before installation of duct when fresh air intake. E E -Knockout hole position for fresh-air intake.- – Making knockout holes Remove the plate with heat insulating material .Readjust the height of the Multi-functional casement CD with the gauge which is attached to the decorative panel as show right. ,5 DD D D D Indoor unit J, = ;:: =l=z:tMulti-functional casement o I’- DD D V .Be sure to use the PAC-SH650F-E (optional) for duct flange. The gap must be in a range from 17mm(11/16in.) to 22mm(7/8in.). If out of range, it can cause malfunction. Gauge (Insert to the Multi-functional casement) 1 [I] Installation of duct (in case of fresh air intake) Linkage of duct fan and air conditioner [!] Installation of Decorative panel nstallation of duct flange I .Install the optional duct flange referring to the installation manual provided with it.